개발자에게 Mac OS X 기본 터미널 앱의 부족함을 채워줄 개발 환경을 iTerm2와 oh-my-zsh를 통해 변경, 구축해 보고자 한다.
참고로, Mac OS X의 기본 쉘이 bash에서 zsh로 변경된 카탈리나 이후 버전의 OS를 기준으로 작성했다.
1. iTerm2 설치
기본 터미널 앱에 비해 제한적인 요소가 덜하고 좀 더 다양한 기능을 가진 터미널 프로그램으로 iTerm2를 설치한다.
iTerm2 - macOS Terminal Replacement
iTerm2 by George Nachman. Website by Matthew Freeman, George Nachman, and James A. Rosen. Website updated and optimized by HexBrain
iterm2.com
2. oh-my-zsh 설치
oh-my-zsh는 이제 기본 쉘이 된 zsh를 보다 유연하게 다룰 수 있게 하는 프로그램으로, 다음 명령 구문을 통해 설치할 수 있다.
# oh-my-zsh 설치
$ sh -c "$(curl -fsSL https://raw.github.com/ohmyzsh/ohmyzsh/master/tools/install.sh)"
아래는 iTerm2에서 설치한 후의 화면이다.

oh-my-zsh에 대한 자세한 사항은 아래 경로에서 확인하기 바란다.
Oh My Zsh - a delightful & open source framework for Zsh
Oh-My-Zsh is a delightful, open source, community-driven framework for managing your ZSH configuration. It comes bundled with several helpful functions, helpers, plugins, themes, and a few things that make you shout... OH MY ZSH!
ohmyz.sh
3. Theme 변경
3.1 ZSH Theme 변경
다음의 구문을 통해 ~/.zshrc 파일을 열고, ZSH_THEME를 "agnoster"로 변경한다.
# ~/.zshrc 열고, ZSH_THEME="agnoster"로 변경
$ open -e ~/.zshrc

# 변경내용 적용
$ source ~/.zshrc
3.2 iTerm2 Theme 변경
iTerm2의 테마는 다음의 사이트에서 여러 사람들이 구성해 놓은 테마 중 맘에 드는 것을 골라 설정하면 된다.
https://iterm2colorschemes.com/
Iterm Themes - Color Schemes and Themes for Iterm2
iTerm Themes Intro This is a set of color themes for iTerm (aka iTerm2). Screenshots below and in the screenshots directory. Installation Instructions To install: Launch iTerm 2. Get the latest version at iterm2.com Type CMD+i Navigate to Colors tab Click
iterm2colorschemes.com
선택한 테마는 다운로드 받아 .itemcolors 파일 형태여야 한다. (테마 이름 우클릭 후 저장)

이제 iTerm2를 열고, Preferences > Profiles > Colors 탭에서 우측하단의 "Color Presets"를 눌러 다운로드한 테마를 import 한 후 사용할 테마로 설정한다.

4. Font 변경
때때로 테마에 따라 폰트가 깨지는 경우가 있어, 많은 개발자들이 사용하고 있는 Naver D2 Coding 폰트를 설치한다.

아래 경로에서 다운로드 한다.
https://github.com/naver/d2codingfont
GitHub - naver/d2codingfont: D2 Coding 글꼴
D2 Coding 글꼴. Contribute to naver/d2codingfont development by creating an account on GitHub.
github.com
폰트 설치 방법은 아래 사이트를 참고하자.
https://support.apple.com/ko-kr/HT201749
Mac에서 서체를 설치 또는 제거하는 방법
Mac에는 많은 서체가 내장되어 있으며 Apple 및 기타 소스에서 서체를 추가로 다운로드하여 설치할 수 있습니다. 서체가 앱에 나타나지 않게 하려면 서체를 비활성화하거나 제거하면 됩니다.
support.apple.com
이제 다시 iTerm2를 열고, Preferences > Profiles > Text 탭 하단의 Font에서 설치한 폰트로 설정한다.

5. 기타
5.1 프롬프트 꾸미기
다음과 같이 프롬프트를 간소화하거나 이모지 등을 통해 꾸며볼 수 있다.
5.1.1 프롬프트 간소화
다음 구문을 ~/.zshrc에 삽입해 사용자 이름 뒤에 붙는 컴퓨터 이름을 제거하여 프롬프트를 간소화한다.
# Prompt customization
prompt_context() {
  if [[ "$USER" != "$DEFAULT_USER" || -n "$SSH_CLIENT" ]]; then
    prompt_segment black default "%(!.%{%F{yellow}%}.)$USER"
  fi
}
5.1.2 이모지를 활용한 프롬프트
다음 구문을 ~/.zshrc에 삽입해 랜덤하게 이모지가 포함된 프롬프트로 꾸며볼 수 있다. 참고로 '{사용자이름}'에는 원하는 텍스트를 마음대로 넣으면 된다.
# Prompt customization (random emoji)
prompt_context() {
  emojis=("🌙" "🚀" "🔥" "🚦" "⚡️" "😎" "👑" "🌈" "🐵" "🦄" "🐸" "🍻" "💡" "🎉" "🔑")
  RAND_EMOJI_N=$(( $RANDOM % ${#emojis[@]} + 1))
  prompt_segment black default "{사용자이름} ${emojis[$RAND_EMOJI_N]} "
}
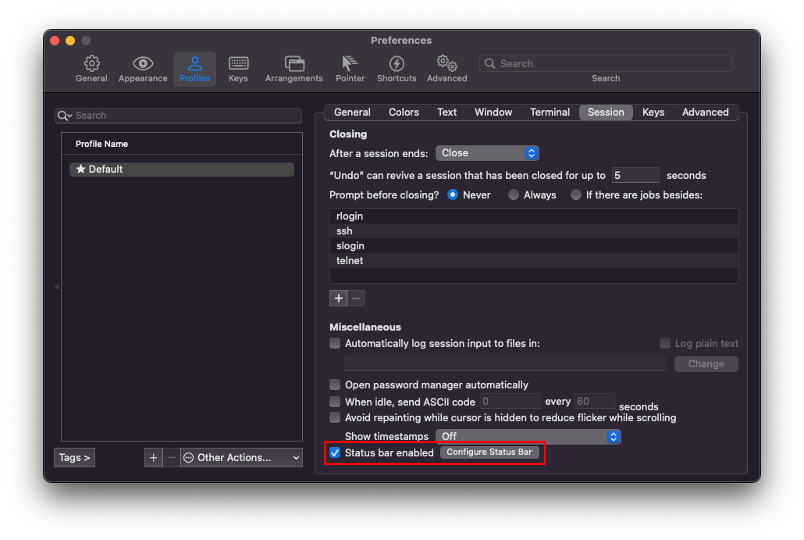
5.2 상태바 추가
iTerm2 하단에 상태바를 추가해 다양한 정보들을 확인할 수 있다.
우선 Preferences > Profiles > Session 탭 하단에서 상태바를 활성화한다.
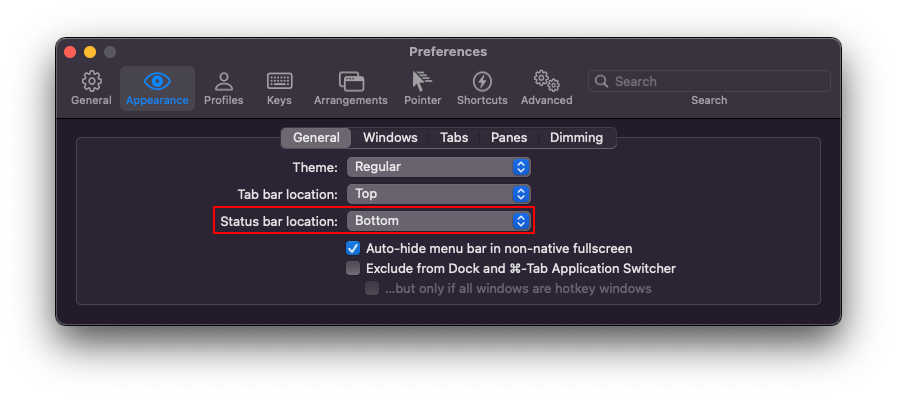
이어서, Preferences > Appearance 탭에서 상태바 위치를 변경한다.
5.3 플러그인
먼저, 다음 구문을 통해 플러그인 폴더에 명령어 하이라이팅 플러그인 zsh-syntax-highlighting과 자동완성 플러그인 zsh-autosuggestions를 설치한다.
# 명령어 하이라이팅 플러그인 설치
$ git clone https://github.com/zsh-users/zsh-syntax-highlighting.git ${ZSH_CUSTOM:-~/.oh-my-zsh/custom}/plugins/zsh-syntax-highlighting

# 자동완성 플러그인 설치
$ git clone https://github.com/zsh-users/zsh-autosuggestions $ZSH_CUSTOM/plugins/zsh-autosuggestions
이후 ~/.zshrc 파일을 열고 plugins 부분에 다음과 같이 zsh-syntax-highlighting과 zsh-autosuggestions를 추가한다.

아래는 위 설정들을 그대로 적용해 사용중인 iTerm2의 모습이다.

검색해 보면 보다 다양한 설정 방법들이 많이 있으니 입맛에 맞게 선택, 적용하면 좋을 것 같다.
'Tip and Tech > Mac OS X' 카테고리의 다른 글
| 맥(Mac OS X)에서 터미널로 Git 설치하기 (0) | 2023.03.03 |
|---|---|
| 맥(Mac OS X) 원격 접속 환경 구축하기 (0) | 2021.06.01 |
| 맥(Mac OS X)에서 원격 접속하기 (0) | 2021.05.24 |


